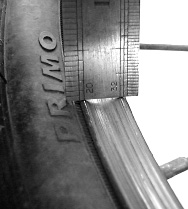
If daylight is visible under a straight edge, wear is well underway. This example is close to failure
I always put the correct type of brake blocks on the bike. My steel front wheel is still OK, requires Fibrax brake blocks and the bearings greasing occasionally, though the braking is not as good as the alloy rear.
Ian Fleming
Bath
This is, indeed, a common problem, so you were lucky to get six years use out of the rim! Steel rims will last until they’re consumed by rust, but they’re heavy, and braking effect can be unpredictable, particularly in the wet. Aluminium is lighter and provides a much better friction surface, but the metal wears away rather rapidly, hence the problem. Small wheel rims have less surface area, so wear is greater, and Bromptons seem particularly prone, although statistics being what they are, this may be because Bromptons tend to do a higher all-weather mileage than other folders.
Do alternative brake blocks help? In the absence of proper research, it’s hard to say.Wear is primarily caused by grit caught in the block, rather than the block itself. Larger, softer blocks trap more grit, but apply less pressure to the rim per unit area, and vice versa for the smaller, harder variety. There’s some evidence that the large, soft kind can enhance the machine’s stopping ability without obviously increasing wear, so I’d suggest large blocks if in doubt.The Aztec long block is a good all-round performer, although I would hesitate to claim this was the best, by any means.
Of one thing you can be sure. Ride any distance on a small wheeled bike with alloy rims – particularly on muddy, wet and/or salty roads – and you will eventually experience a rim failure. Rims can fail catastrophically, but this is rare and usually the result of poor maintenance. The chances of failure can be minimised by following a few simple rules:

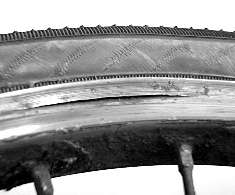
The first sign of failure. With reduced tyre pressure, a rim like this can be ridden a short distance with great care
1) Inspect the rims regularly, particularly in winter. Failure is caused by many factors, but it’s sensible to start inspecting the rims at 2,000 miles or two years, whichever comes sooner, and checking on a regular basis thereafter. Road grit tends to accumulate around the rear wheel, and it’s here that the inspection should be concentrated. Grinding noises or obvious bright score marks usually mean something nasty trapped in a brake block, and removing it can extend the rim life by many miles. On the other hand, it could mean that the brake block material has worn through, putting the steel backing plate in direct contact with the alloy rim. Never, ever, ride a bike in this condition – the steel can eat through the rim in a matter of minutes.
Failure normally occurs when the rims have worn wafer thin.Wear is easily detected by holding a ruler against the rim, or rubbing your finger tips across it – if the surface feels slightly concave, wear is underway, but if the blocks have worn a pronounced groove, failure may be imminent.This sort of thing can only be judged by experience, so if in doubt, get a second opinion, or simply replace the rim.
2) For obvious reasons, rims tend to fail after the tyres have been inflated. A heavily worn rim can survive for months without any sign of distress, but over-enthusiastic work with a footpump causes a bulge.You can use this to your advantage by deliberately over-inflating the tyres every few weeks and thoroughly inspecting the rims. But don’t try this ten minutes before pedalling to work.

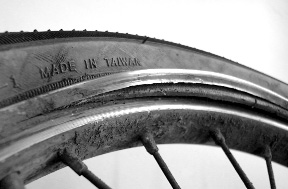
Do nothing and the rim may fail catastrophically...
Generally, a ‘young’ bulge occurs over a couple of centimetres of rim and makes it’s presence felt as a rhythmic thump whenever the brake is applied – mild examples as a gentle tap through the brake lever, but serious bulges may cause the bike to vibrate noticeably. Stop (without a panic brake application, naturally) and take a closer look.
If major damage has occurred, push the bike home. If you attempt to ride, there’s a very real chance that the wheel will either lock solid or disintegrate.
…There is one more option – the brake blocks can usually be realigned closer to the spokes…
3) With mild examples, all is not lost. If the bulge is small, reducing the tyre pressures – 20lbs front and/or 30lbs rear – should get you home. But do ride with caution and stop to investigate any noise or vibration. If there is a growing crack around the damaged section of rim, or you can’t eliminate the bump-thump under braking, there is one more option.The brake blocks can usually be realigned against an unworn section of rim closer to the spokes. If the brakes work smoothly and the bulge in the rim looks stable, it’s permissible to ride on with care.

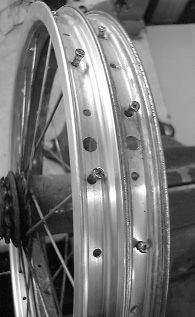
With the new rim brought up against the old, the spokes can be transferred one at a time
Alloy rims are not expensive, but fitting is time-consuming, so labour costs can push up the price. If you have the confidence, small wheels are much easier to build than the large variety, and with hub gears, there’s usually no complicated rim offset or differential spoke tension to worry about.
The easiest way (provided the spokes and nipples are in good condition), is to put the old wheel in a vice, loosen the spokes, and transfer them one at a time to the new rim.This should be stood alongside the old one, with the tube hole in the same position. Start transferring the spokes nearest to the new rim and work methodically round the rim, fitting the nipples loosely in place as you go. A drop of oil will not go amiss here, as it’s difficult to tension spokes that are tight on their threads, and dry threads will corrode later.When the closest seven (or 9 on a 36-spoke wheel) have been transferred, move straight on to the next group, then cross the wheel to the third and fourth. In an hour, you should be holding a loosely strung wheel.
Small wheels are easy to true as well, but if in doubt, it’s time to call in a professional.Truing involves tightening the spoke nipples very gradually to the proper tension, checking as you go to correct any rim misalignment, either horizontal or vertical.
Experts will run through this process very quickly, but it’s worth taking your time.The wheel can be either mounted in a vice, or refitted to the bike temporarily. It is, however, essential to mount the wheel firmly, in such a way that a fixed point can be brought up against the top or side of the rim as required, to check the alignment.
First hand-tighten the spokes, then give each one a half turn and check that the wheel is starting to come together reasonably straight. As tension begins to build, it’s a good idea to go round the rim, pushing hard against the side of each spoke with your thumbs to ensure the spoke and nipple are properly bedded down.
 The next stage is to check the vertical and horizontal alignment.To check this, you’ll need a fixed point, such as an old spoke mounted on a heavy block – slide the block forward until the spoke just contacts the high spots on the rim. The aim is to adjust the spoke tension until your fixed point touches the entire rim when the wheel is spun. If the wobble is up and down, gently tighten all the spokes at the high spot and loosen those on the far side of the wheel. If the wobble is side to side, loosen the spokes attached to the appropriate side of the hub, and tighten those on the other side.
With the rim more or less true (don’t spend hours fiddling at this stage), go back to the start and tighten all the spokes by a smaller, but equal amount, recheck, and so on.When the spokes produce a nice satisfying twang when struck, and the rim is as well aligned as you can get it without tearing your hair out, you’re more or less there. If you have time, it’s worth leaving the wheel overnight, squidging all the spokes again with your thumbs, re-check, re-adjust, re-twang, and so on. Perfection is quite unnecessary: provided the brakes work smoothly, there are no vibrations, and the tyre runs a reasonably straight course, the wheel is fit for the road.
After riding for a week or two, it’s worth re-checking the tension. Such attention to detail is sadly all too rare these days, but on a rear wheel in particular, correct tension can greatly enhance the life of the spokes. It’s generally assumed that the spokes break through excessive load – partly true, but the real reason is that a loosely spoked wheel bends and ‘squirms’ as load increases, and this constant fretting movement causes the spokes to fail through metal fatigue.
![]()